
Setting Up Seeders in Node.js and Mongoose with Example
Photo by Gabriel Heinzer on Unsplash
Introduction: In Node.js applications using MongoDB with Mongoose, seeders play a crucial role in populating the database with initial data. This article will guide you through the process of setting up seeders, with a specific focus on creating an admin user during the seeding process.
Understanding Seeders: Seeders are scripts designed to populate your database with predefined data. They are essential for maintaining a consistent and realistic database state during development and testing.
Installing Necessary Packages: Ensure you have the required packages installed for your Node.js and Mongoose projects. If not, install Mongoose:
npm install mongoose
Project Structure: Organize your project with designated folders for models and seeders. Here’s an example structure:
project-root
├── models
│   └── user.js
├── seeders
│   └── admin-seeder.js
└── app.js
Creating a Mongoose Model: Define a Mongoose model for the data you want to seed. For this example, let’s create a simple User model.
// models/user.js
const mongoose = require("mongoose");

const userSchema = new mongoose.Schema({
  name: String,
  password: String,
  isAdmin: Boolean,
  // Add other fields as needed
});

const UserModel = mongoose.model("User", userSchema);

module.exports = UserModel;
Writing the Admin Seeder Script: Create the seeder script to populate the database, including the creation of an admin user.
// seeders/admin-seeder.js
const mongoose = require("mongoose");
const bcrypt = require("bcryptjs");
const UserModel = require("../models/user");

async function seedAdmin() {
  // Connect to the database
  await mongoose.connect("mongodb://localhost/your-database", {
    useNewUrlParser: true,
    useUnifiedTopology: true,
  });

  // Check if admin already exists
  const existingAdmin = await UserModel.findOne({ isAdmin: true });

  if (!existingAdmin) {
    // Create admin credentials
    const adminCredentials = {
      name: "Admin User",
      password: "adminpassword",
      isAdmin: true,
      // Add other fields as needed
    };

    // Hash the admin password
    const salt = await bcrypt.genSalt(10);
    const hashedPassword = await bcrypt.hash(adminCredentials.password, salt);
    adminCredentials.password = hashedPassword;

    // Create admin user
    await UserModel.create(adminCredentials);

    console.log("Admin user created successfully");
  } else {
    console.log("Admin user already exists");
  }

  // Close the database connection
  await mongoose.disconnect();
}

// Execute the admin seeder
seedAdmin().then(() => {
  console.log("Admin seeding completed");
  process.exit(0);
}).catch((err) => {
  console.error("Error seeding admin:", err);
  process.exit(1);
});
Running the Admin Seeder Script: Execute the admin seeder script whenever you need to populate the database, including the creation of the admin user.
node seeders/admin-seeder.js
Conclusion: Setting up seeders in Node.js and Mongoose provides an efficient way to populate your database with initial data. By incorporating an example of creating an admin user during the seeding process, this guide helps you establish a solid foundation for managing your database seeders in Node.js projects.

> Written by
Emdadul Islam
Software Engineer. View profile →
Read more
A Guide to Downloading Images from a Database using Node.js
Learn how to download images from MongoDB using Node.js with this step-by-step tutorial. Perfect for developers using Node.js and MongoDB

How to Deploy an AI Agent with Amazon Bedrock AgentCore
Deploy AI agents with Amazon Bedrock AgentCore for scalable configuration on AWS, integrating with frameworks like LangGraph and CrewAI
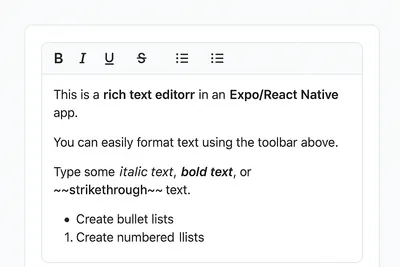
How to Add a Native Rich Text Editor in Expo / React Native (No WebView)
Use expo-rte for a native rich text editor in Expo/React Native, offering cross-platform, customizable, native performance without WebView